»

Tuesday, November 26, 2013

Windows Server Hacks: Remotely Enable Remote Desktop

Remote Desktop is a cool feature of Windows Server 2003 that lets you remotely log on to and work at a machine as if you were seated at the local console (in Windows 2000 Advanced Server, this feature was called Terminal Services in Remote Administration Mode). Remote Desktop can be a lifesaver for fixing problems on servers at remote sites, but what if you forgot to enable the feature before you shipped the server out to Kalamazoo? Enabling Remote Desktop is easy if the server is in front of you: just log on as an administrator, open System in Control Panel, select the Remote tab, and under Remote Desktop select the checkbox labeled "Allow users to connect remotely to this computer." Unfortunately, you can't use the System utility to enable Remote Desktop on a remote machine, though you can access some properties pages of System using Computer Management by first connecting the console to a remote computer, then right-clicking on the root node and selecting Properties. Unfortunately, as you can see in Figure 1 below, the Remote tab is not available when you access System properties this way on a remote machine (here named SRV220).

Figure 1
Figure 1. System properties for a remote machine does not have Remote tab.

Fortunately, there's a workaround. Sit down at your desk and log on to your Windows XP workstation using your administrator credentials and start Registry Editor by Start --> Run --> regedit --> OK. Then select the Connect Network Registry option under the File menu (Figure 2).

Figure 2
Figure 2. Connecting to the Registry on a remote machine.

This opens the Select Computer search box. Either browse Active Directory to locate the remote server, or type its name in the textbox (Figure 3).

Figure 3
Figure 3. Connecting to the Registry on a remote server named SRV220.

Click OK and a node will be displayed in Registry Editor for the remote machine (Figure 4).

Figure 4
Figure 4. HKLM and HKU hives on SRV220.

Now browse HKLM on SRV to find the following Registry key (Figure 5).

HKLM\SYSTEM\CurrentControlSet\Control\Terminal Server


Figure 5


Figure 5. Registry key for Terminal Server on remote machine.


Under the Terminal Server key, you'll find a REG_DWORD value named fDenyTSConnection. Double-click on that value to open the Edit DWORD Value box and change the value data from 1 (Remote Desktop disabled) to 0 (Remote Desktop enabled), as in Figure 6 below.


Figure 6


Figure 6. Set fDenyTSConnections to 0 to enable Remote Desktop on SRV220.


The remote machine needs to be rebooted for the change to take effect, so open a command prompt and type the following command:


shutdown -m \\srv220 -r


After the remote machine reboots, Remote Desktop should be enabled on it. To test this from your workstation, open Start --> All Programs --> Accessories --> Communications --> Remote Desktop Connection, enter the name of the remote server in the Remote Desktop Connection logon box, supply your administrator password when prompted, and you're in.

Thursday, November 21, 2013

How to backup VMware using the Volume Shadow Copy Service


Summary: The purpose of this guide is to show you how to setup and use the VMWare VSS writer to perform consistent VSS backups of VMWare guest machines.

Note: Some of the following instructions can also be found in the VMWare Server 2.0 technical documentation.

Limitations

  • The VMWare VSS writer is only installed with VMWare Server 2.0 and later.
  • This procedure is only possible on Server 2003 32-bit and 64-bit and Server 2008 32-bit operating systems.

Checking the VMware VSS Writer is present

First, you need to check that the VMWare VSS writer is present on the machine and that it is working correctly.

  1. Open a Command Prompt by navigating to Start > Run and typing 'cmd' in the text field provided.
  2. In the command prompt window type vssadmin list writers and press Enter. This will list all the VSS writers running on the machine and their current state.
  3. Locate the 'VMWare vss writer' and confirm that it is in a stable state.
    Tip: record the 'Writer Id' for the VMware VSS Writer by right-clicking the command prompt window and selecting 'Mark'. Now drag a box around the Writer Id and press Enter. You can now copy the Writer Id to a text file in Notepad.
    wbadmin versions list
    If the VMware VSS Writer is not listed check that the 'VMware VSS Writer' service is started under Control Panel > Administrative Tools > Services.

Allowing the VSS writer to overwrite existing snapshots

VMware Server only allows one snapshot for each Guest virtual machine. If a snapshot exists, the VSS writer will not disable the virtual machine.. To override this default behaviour carry out the following:

  1. Create a file called vmvsswriter.cfg in the directory where VMware is installed (by default C:\Program Files\VMware\VMware Server.)
  2. Open the vmvsswriter.cfg in notepad and add the following command:  vmwriter.overwriteSnapshots = "TRUE". This command will allow snapshots to be overwritten.
  3. Save vmvsswriter.cfg and exist Notepad.
  4. Re-start the 'VMWare vss writer' service under Control Panel > Administrative Tools > Services.
  5. You should now be able to backup your VM guests using the native Microsoft Volume Shadow Copy service.

Adding the VMware VSS Writer Id to the Registry

Note: this step is only required for Server 2008 32-bit operating systems.

In order for Windows to be able to utilize the VSS writer, you need to make some modifications to the Windows Registry.
Note: it is a good idea to make a backup of the Windows Registry before carrying out the following steps.

  1. Open RegEdit by going to Start > Run and typing 'regedit' in the text field provided.
  2. Browse to registry key 'HKEY_LOCAL_MACHINE\SOFTWARE\Microsoft\Windows NT\CurrentVersion\WindowsServerBackup\Application Support\'
  3. Add the VMware Writer Id that you recorded earlier (step 3 under 'Checking the VMware VSS writer is present') as a new key by right-clicking on Application Support and selecting New > Key.
  4. With the new Key still selected choose Edit from the top menu and select New > String Value.
  5. Call the new String Application Identifier.
  6. Double-click the new String and enter VMware in the 'Value data' field.
    wbadmin system state restore begun

Wednesday, November 20, 2013

How to fix VSS errors in Windows XP and 2003.

1. Click Start, click Run, type Regedit, and then click OK.

2. Locate and then click the following registry subkey:

  • HKEY_LOCAL_MACHINE\SOFTWARE\Microsoft\EventSystem\{26c409cc-ae86-11d1-b616-00805fc79216}\Subscriptions

3. On the Edit menu, click Delete, and then click Yes to confirm that you want to delete the subkey.

4. Exit Registry Editor.

5. Click Start, click Run, type services.msc, and then click OK.

6. Right-click the following services one at a time. For each service, click Restart:

  • COM+ Event System
  • COM+ System Application
  • Microsoft Software Shadow Copy Provider
  • Volume Shadow Copy

7. Click Start, click Run, type cmd, and then click OK.

8. At the command prompt, type vssadmin list writers, and then press ENTER.

9. If the VSS writers are now listed, close the Command Prompt window. You do not have to complete the remaining steps. If the VSS writers are not listed, type the following commands at the command prompt. Press ENTER after each command.

  • cd /d %windir%\system32
  • net stop vss
  • net stop swprv
  • regsvr32 ole32.dll
  • regsvr32 oleaut32.dll
  • regsvr32 vss_ps.dll
  • vssvc /register
  • regsvr32 /i swprv.dll
  • regsvr32 /i eventcls.dll
  • regsvr32 es.dll
  • regsvr32 stdprov.dll
  • regsvr32 vssui.dll  (does not work in Windows XP)
  • regsvr32 msxml.dll
  • regsvr32 msxml3.dll
  • regsvr32 msxml4.dll

Note The last command may not run successfully.

10. At the command prompt, type vssadmin list writers, and then press ENTER.

11. Confirm that the VSS writers are now listed.

12. At the command prompt, type vssadmin list shadows and then press ENTER.

13. Confirm that there are no errors listed.  On Windows XP you should see: No shadow copies present in the system.

14. Congratulations your machine should work again with any VSS compatible programs.

Thursday, September 26, 2013

How to Reset Your Forgotten Windows Password the Easy Way


image[2]

Forgetting your password is never any fun, but luckily there’s a really easy way to reset the password. All you need is a copy of the Windows installation disk and one simple command line trick.

Resetting Your Forgotten Windows Password

Boot off the Windows disk and select the “Repair your computer” option from the lower left-hand corner.

Follow through until you get to the option to open the Command Prompt, which you’ll want to select.

First you’ll want to type in the following command to backup the original sticky keys file:

copy c:\windows\system32\sethc.exe c:\

Then you’ll copy the command prompt executable (cmd.exe) over top of the sticky keys executable:

copy c:\windows\system32\cmd.exe c:\windows\system32\sethc.exe

Now you can reboot the PC.

Resetting the Password

Once you get to the login screen, hit the Shift key 5 times, and you’ll see an administrator mode command prompt.

Now to reset the password—just type the following command, replacing the username and password with the combination you want:

net user geek MyNewPassword

That’s all there is to it. Now you can login.

Of course, you’ll probably want to put the original sethc.exe file back, which you can do by rebooting into the installation CD, opening the command prompt, and copying the c:\sethc.exe file back to c:\windows\system32\sethc.exe.

Friday, September 6, 2013

Resizing Windows Volumes / Drives in VMware vSphere / ESX


KB ID 0000381 Dtd 17/06/12

Problem

This article is primarily geared towards making your guest virtual machines hard drives LARGER, If you want to SHRINK or make the drive smaller then see the following article.
Resizing Guest Hard Drives using the VMware Converter

Solution

Re sizing a Guests Hard Drive (Make it larger)

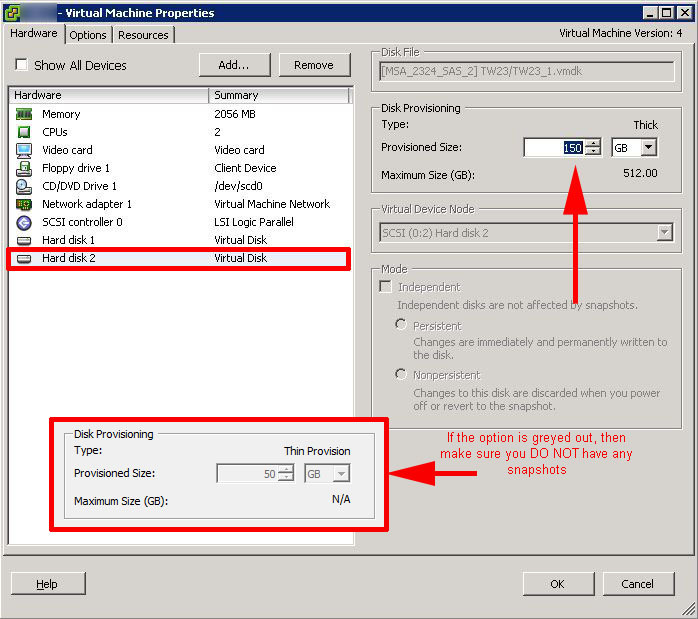
1. On the properties of the VM select the hard disk in question and locate its size.

locate hdd sze

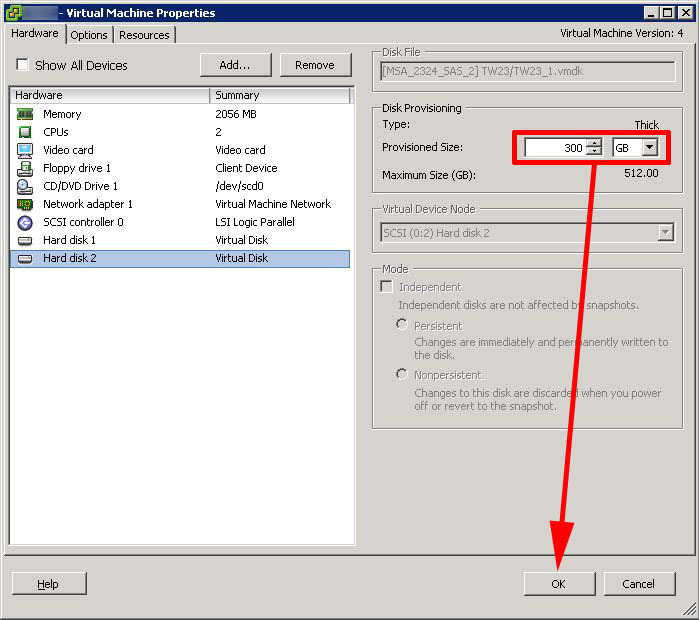
2. Enter the new size and hit OK. Note: Making the drive size smaller, will have no affect, if you want to do that clone the drive. If the option is "Greyed out" then make sure you DO NOT have any snapshots for this machine.

change hdd size for vm

Re-sizing the guests "Volume" Option 1 - Graphically

Note: To do this using diskpart skip forward to number 10.

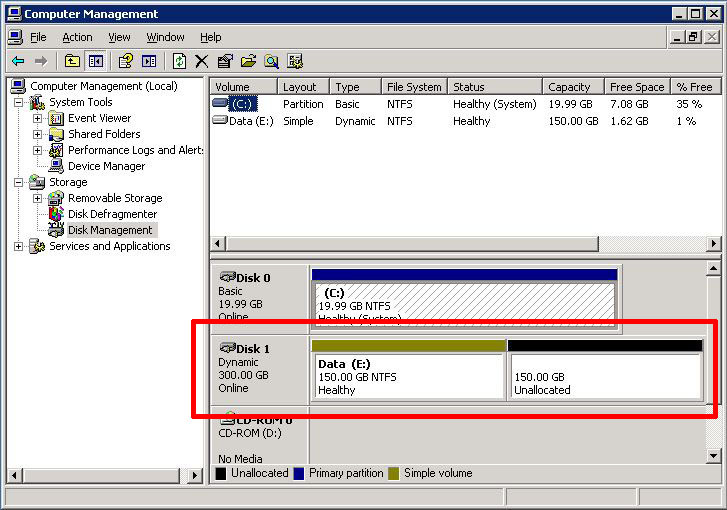
3. On the guest > Right click "My Computer" > Manage > Locate "Disk Management". You will see there's some free space that's appeared on the end of the drive, (Click action > Re-scan if you can't see it).

locate free space

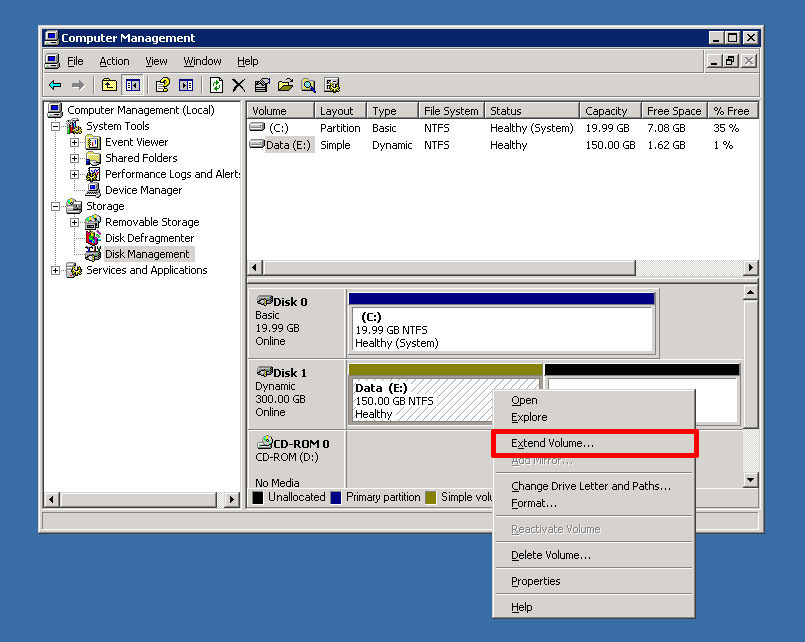
4. Simply right click the existing volume and select "Extend Volume".

how to extend volume grpahically

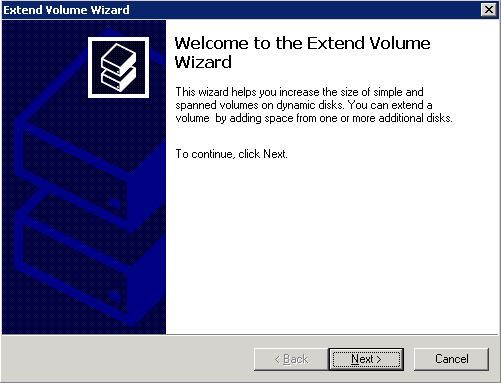
5. Next.

extend volume

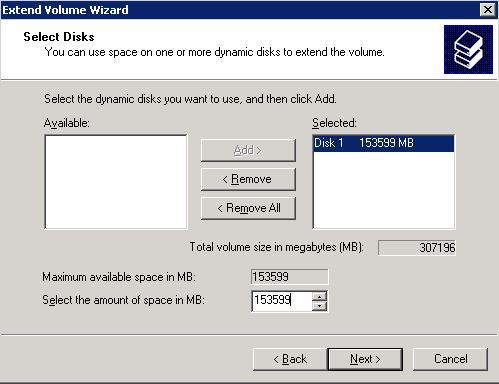
6. Copy in the extra space you want to assign (all of it probably) > Next.

extend volume wizard

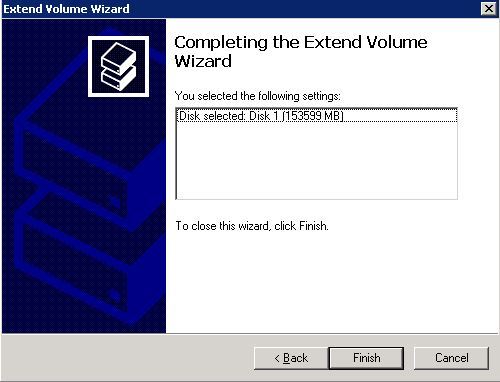
7. Finish.

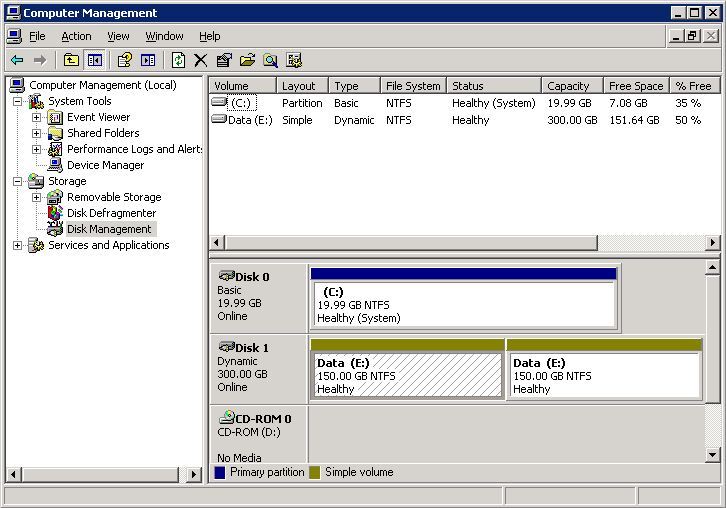
8. All the physical drive should now be committed.

commit changes to drive

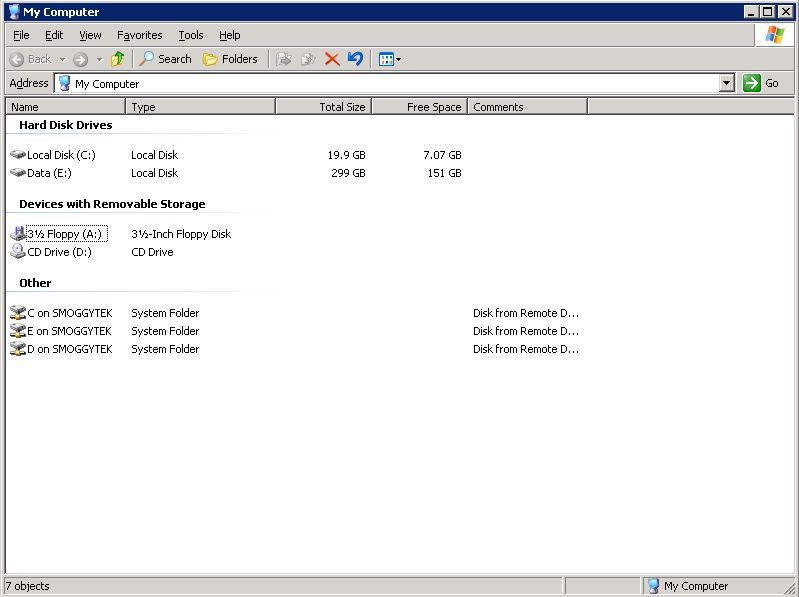
9. And just to be sure, look in "My Computer" the drive is now 300 GB.

drive size

Re-sizing the guests "Volume" Option 2 - From Command Line with diskpart

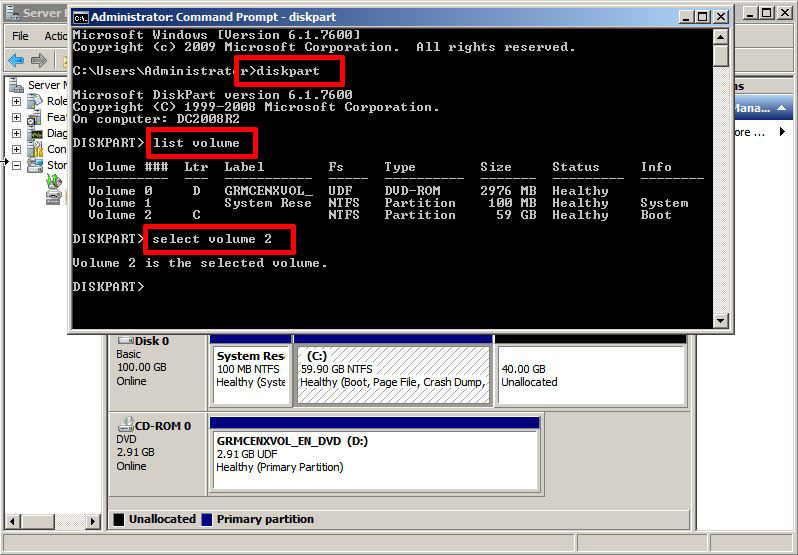
10. Start > run > cmd{enter}

diskpart list volume select volume x --Where x is the volume number of the volume to be re sized

skpart list volumedi

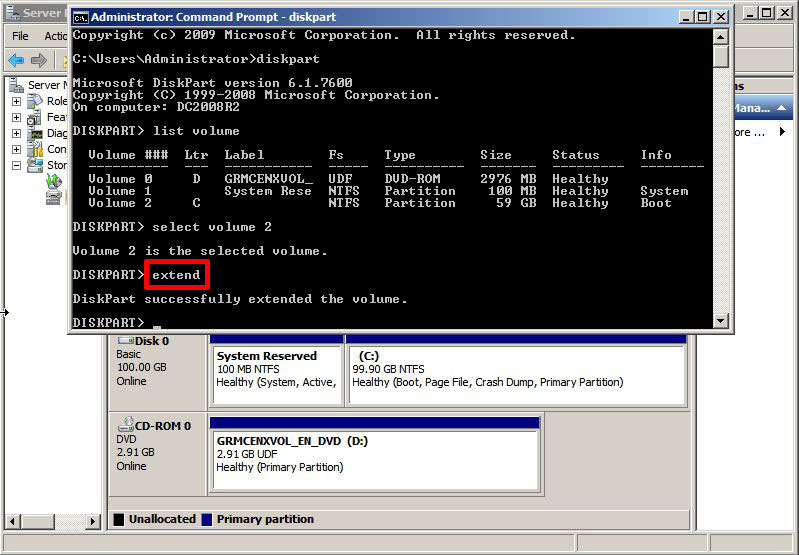
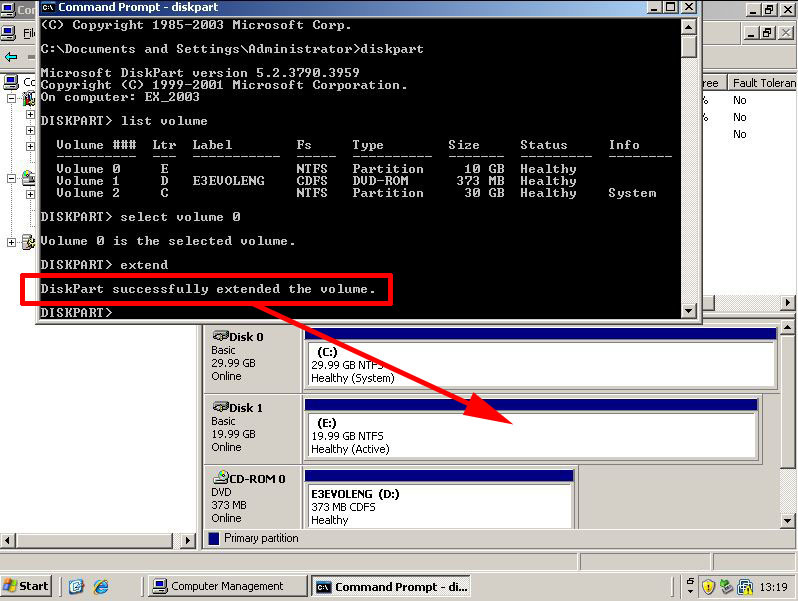
11. The final command is simply extend (This uses ALL the available free space.) Note the volume size in the picture below has jumped up by 40 GB.

diskpart using exend

Resizing a System (boot) Partition.

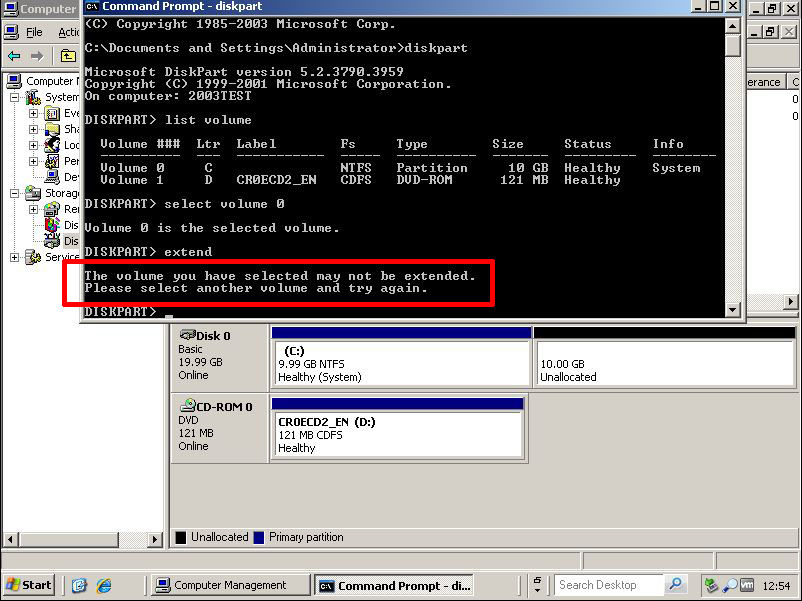
Server 2008 R2 and Windows 7 can do this quite happily. Older versions of Windows do not like having their system drive re sized, you see the following error if you try,

Error:
The volume you have selected may not be extended.
Please select another volume and try again.

The volume you have selected may not be extended.

Option 1 (Connect this drive to another machine)

In a virtual environment this is much simpler, but even if its a real physical hard drive, you can put it into another server and re size it. In an ESX environment simply do the following,

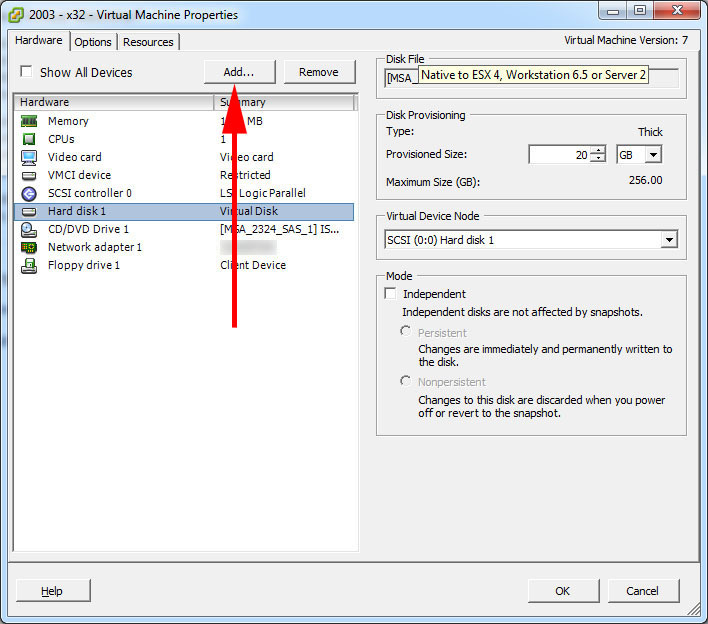
1. Shut down the machine that needs its drive re sizing, then go to another virtual machine's properties and select add.

add hard drive to vmware

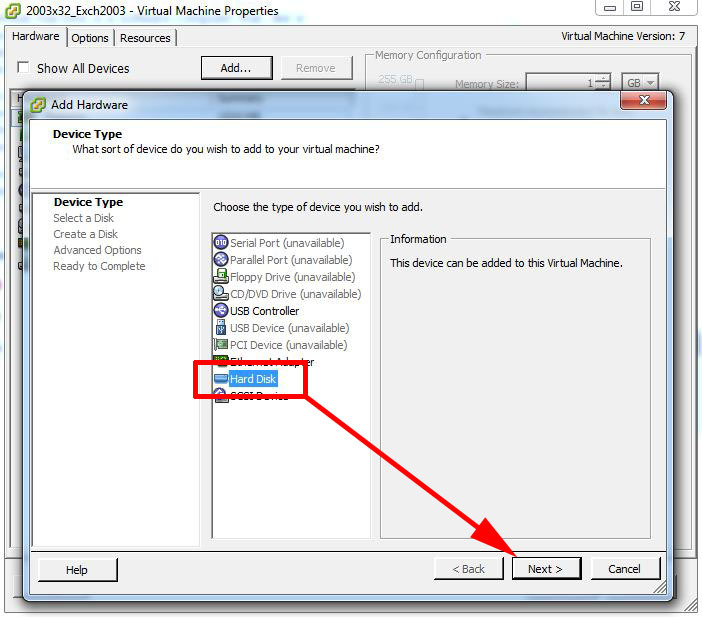
2. Hard Disk > Next.

3. Select "Use existing virtual disk" > Next.

use existing virtual disk

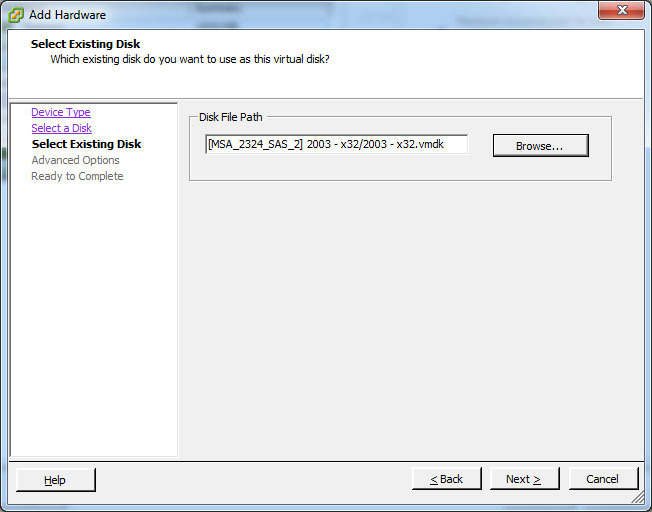
4. Browse to the the drive we want to re size > Next.

vmdk location

5. Next.

scsi options vm

6. Finish.

add hard drive to virtual machine

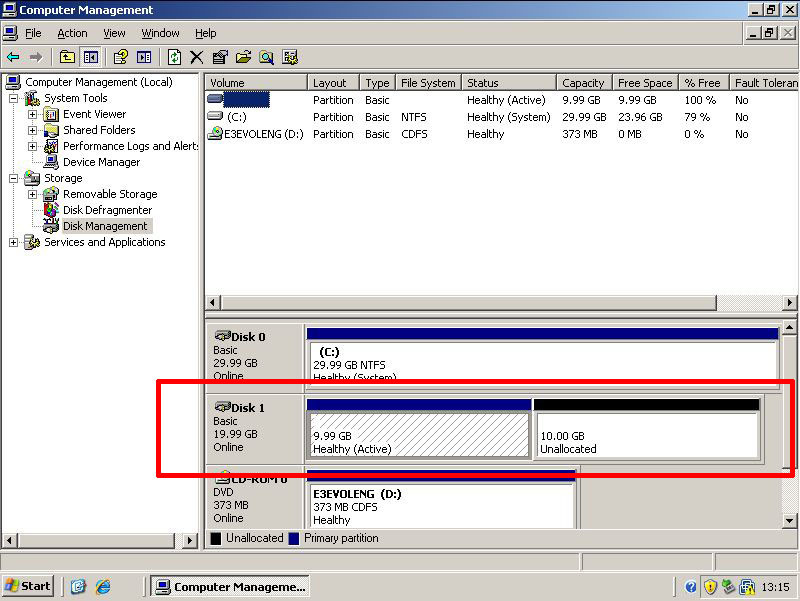
7. Now on the VM (Action > Re-scan disks). You will see the drive, and it's not listed as a system drive, so you can extend it using any of the methods listed above.

use free space with diskpart

8. For example, heres the drive re sized using diskpart.

diskpart extend

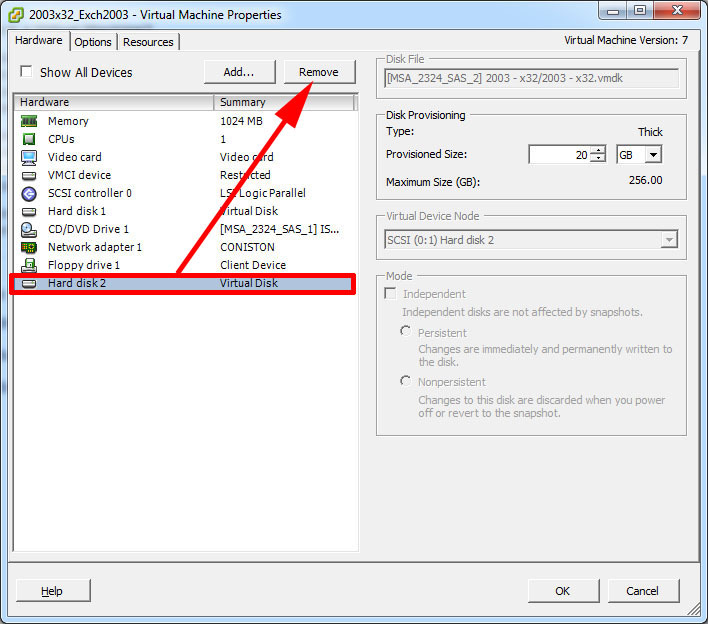
9. when you have re sized the drive go back to the properties of the machine you have connected it to, and remove it.

remove vmdk

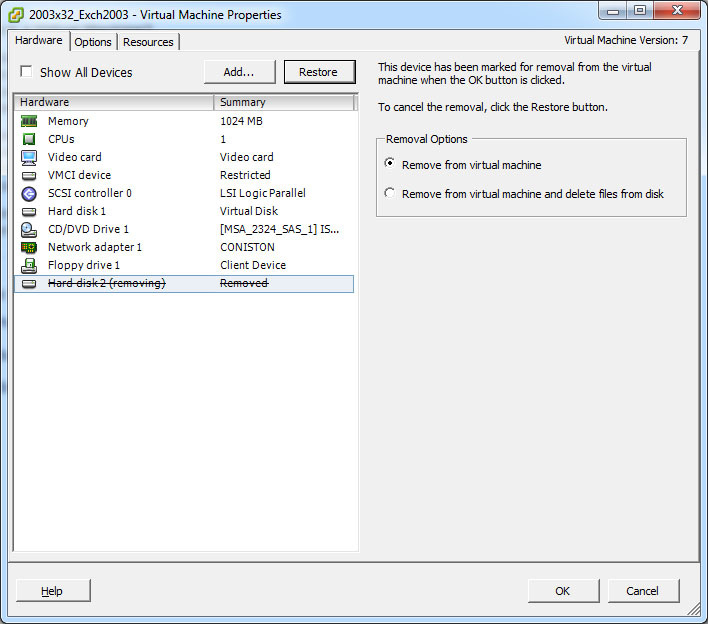
10. OK.

remove disk form vm

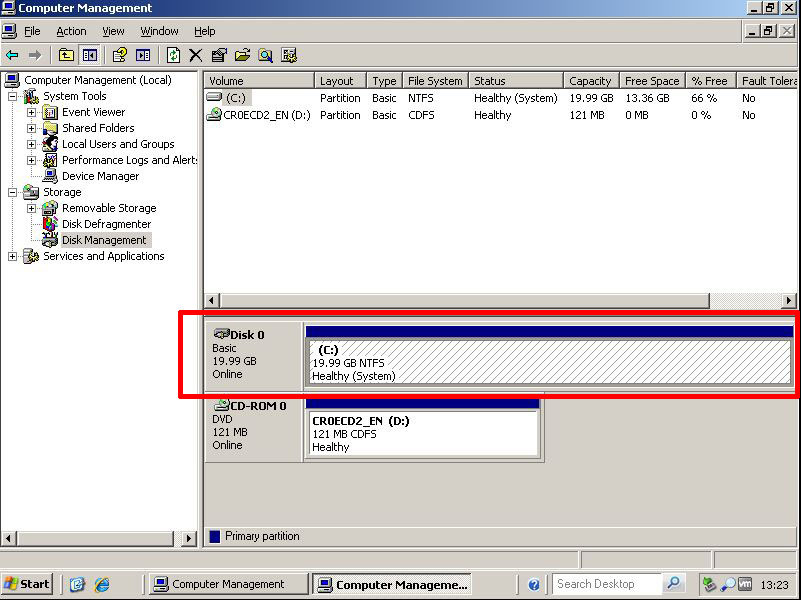
11. Now power on the original VM and drive will be re sized.

resize vm disk

Option 2 (Re size the Windows volume with GParted)

Note: This will work for a physical server as well.

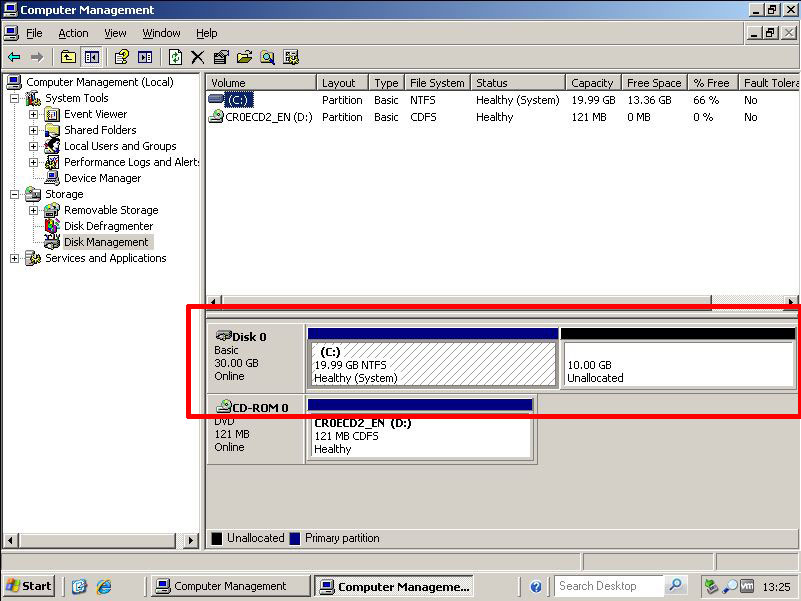
1. Here's our system drive with some nice shiny free space.

repartition servers c drive

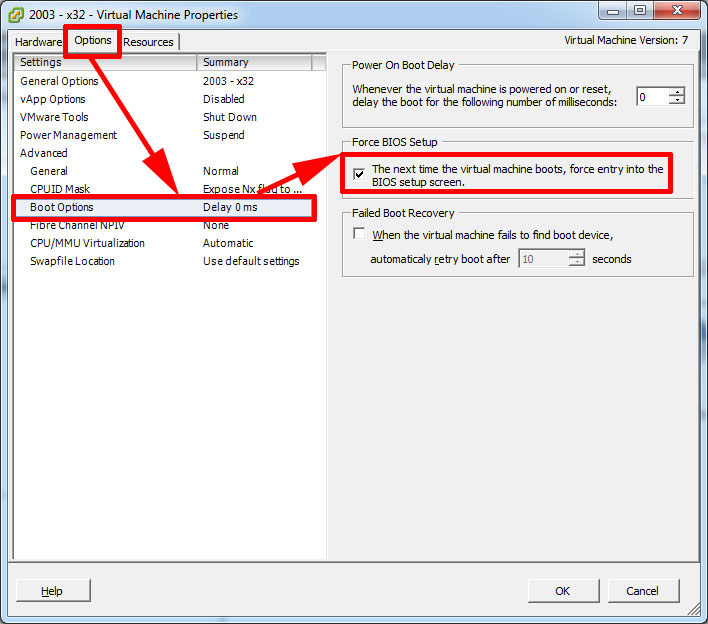
2. Make sure the server in question can boot from CD, in VMware do the following to boot to the machines BIOS, for a real server watch the screen as the server boots for instructions (Usually F10, F1 or Esc but differs depending on vendor).

boot vm to bios

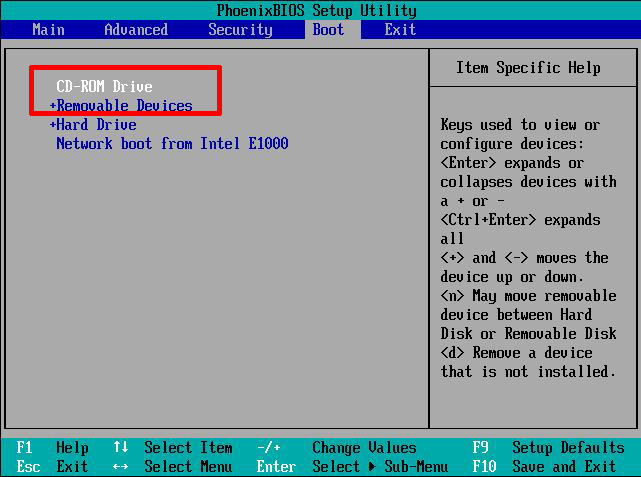
3. Locate the boot order and make sure CD/DVD is at the top of the list.

bios boot order vmaware

4. Download GParted burn the image to CD, if you are working on a real server (use ImgBurn if your stuck). Or simply point the VM to the iso image, and boot the machine in question from it. At the welcome screen press Enter.

linux partition editor

5. Use your arrow and tab keys to select Don't touch the keymap > OK.

keymap

6. Pick a language.

language selctionn linux

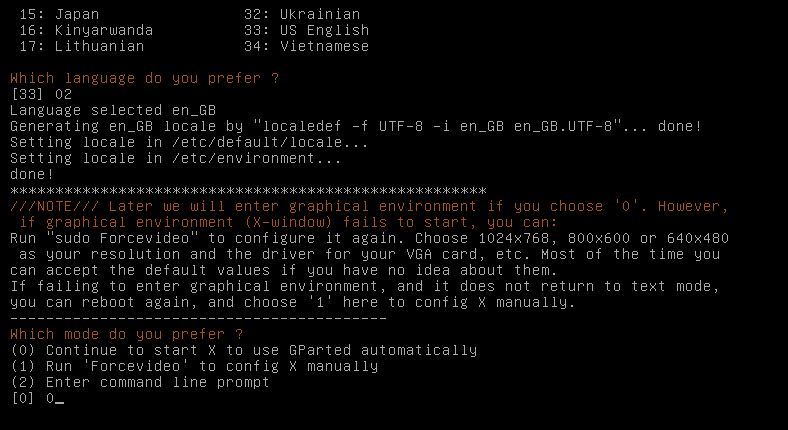
7. We want to launch the GUI (X Windows), so select 0 (Zero).

boot to linux

8. Select Re size/Move > Drag the arrow to include the free space > Re size/Move.

change c drive size

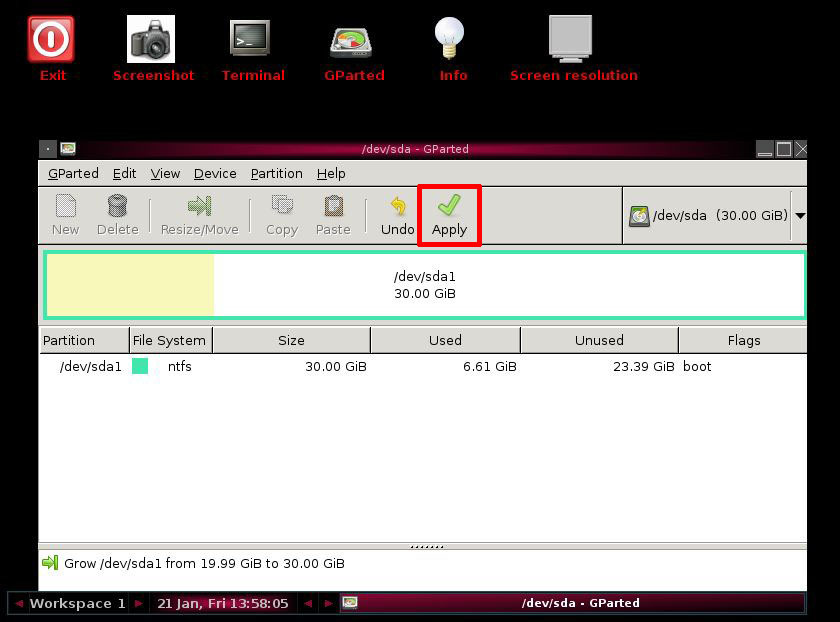
9. Apply

repartition vm

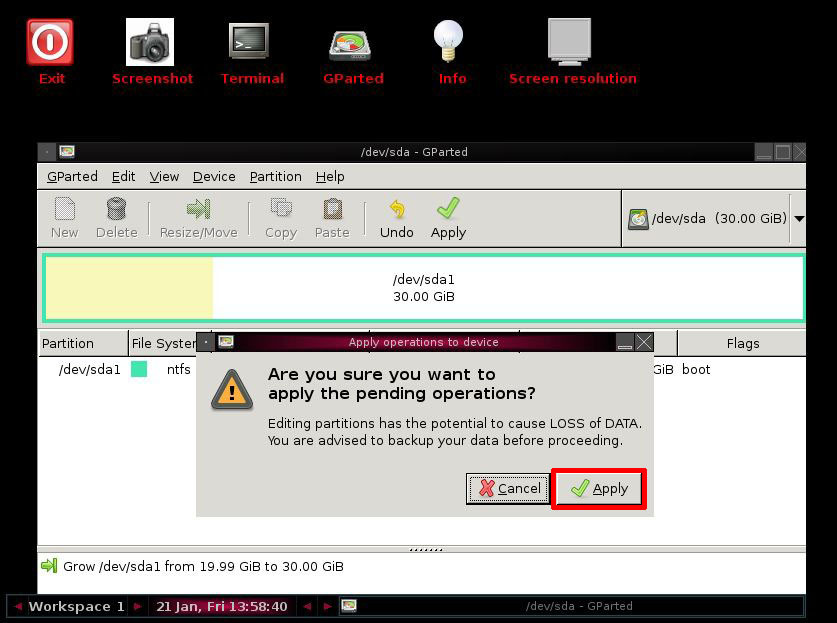
10. Apply.

apply partition changes

11. Close.

change partitions with boot disk

12. Click GParted > Quit.

gparted with vmware

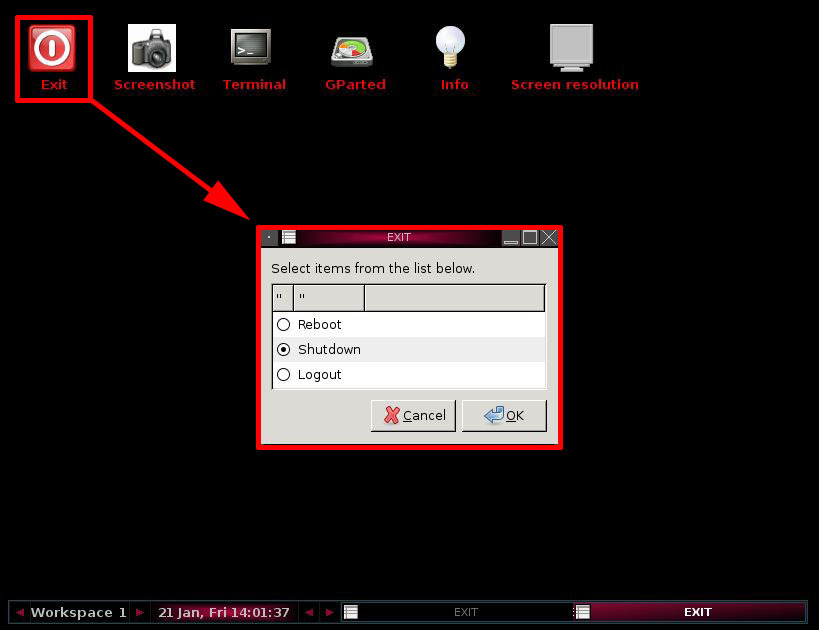
13. Exit > Reboot/Shutdown > OK.

<emptshutdowny>

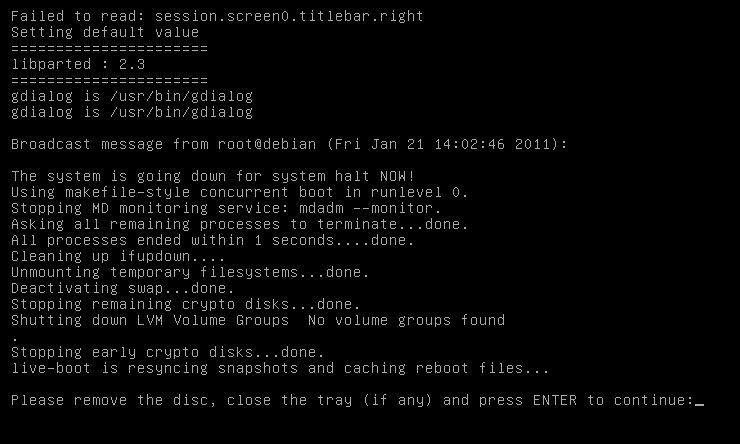
14. Remove the CD/ISO and press Enter.

repartition vm with boot disk

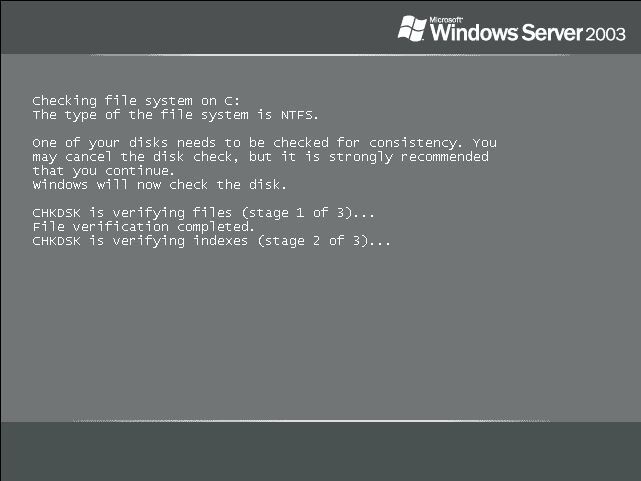
15. The guest will run chkdsk the firs time it boots. This is normal don't panic.

chkdsk running

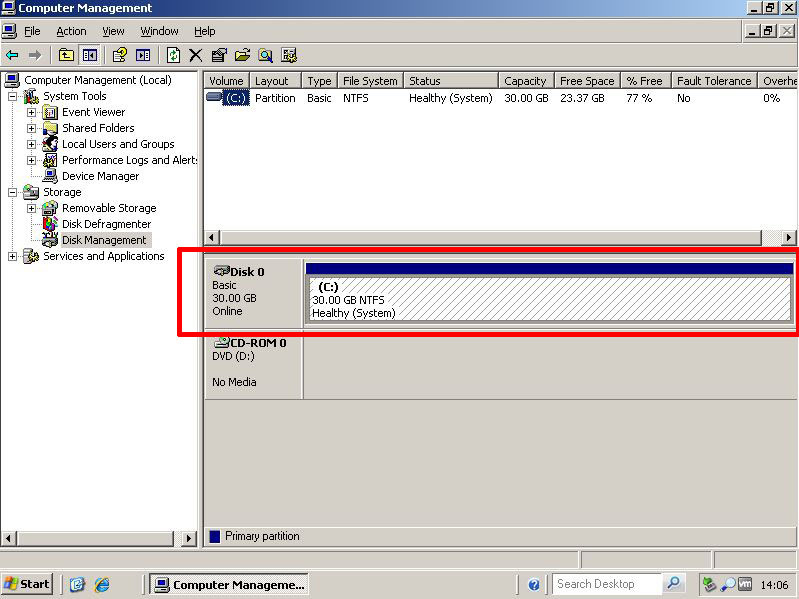
16. Once booted the volume will be re sized.

resize boot partition

Shrink a Windows Partition with diskpart

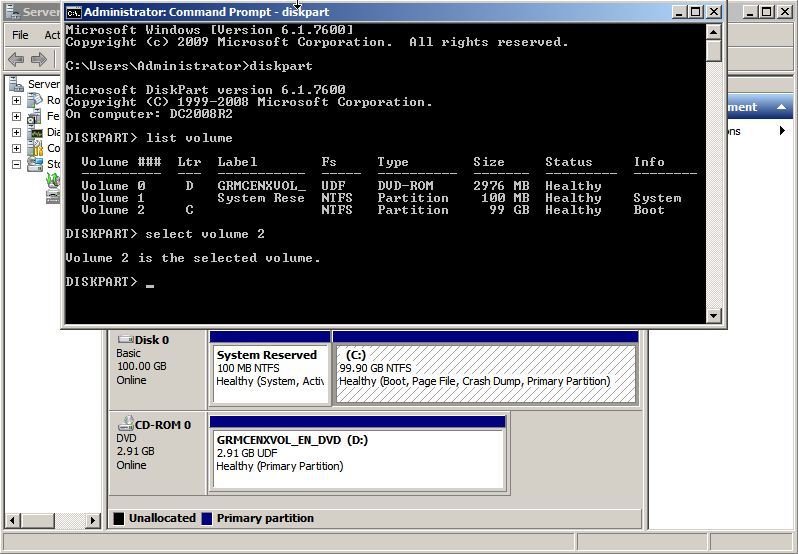
1. To actually make the volume smaller with diskpart, the initial commands are the same.

vmware diskpart

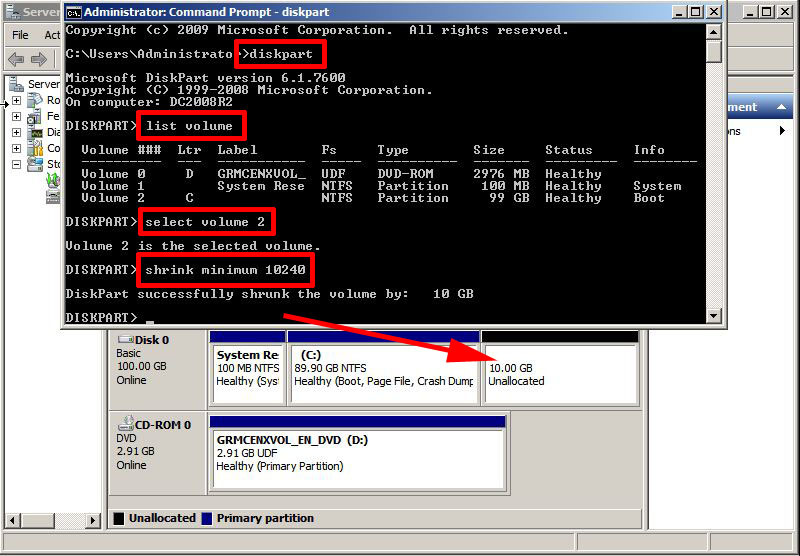
2. If you use "shrink" on its own is will shrink the drive as much as it can (I cannot think of any situation where you would do this!). So to shrink the volume by 10 GB simply issue a "shrink minimum 10240". (The figure in in MB).

diskpart shrink