»

Friday, September 6, 2013

Resizing Windows Volumes / Drives in VMware vSphere / ESX


KB ID 0000381 Dtd 17/06/12

Problem

This article is primarily geared towards making your guest virtual machines hard drives LARGER, If you want to SHRINK or make the drive smaller then see the following article.
Resizing Guest Hard Drives using the VMware Converter

Solution

Re sizing a Guests Hard Drive (Make it larger)

1. On the properties of the VM select the hard disk in question and locate its size.
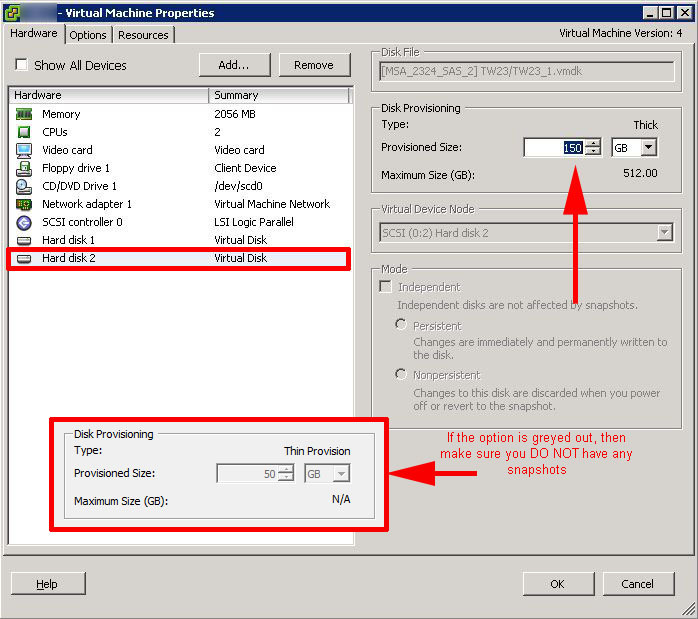
locate hdd sze

2. Enter the new size and hit OK. Note: Making the drive size smaller, will have no affect, if you want to do that clone the drive. If the option is "Greyed out" then make sure you DO NOT have any snapshots for this machine.
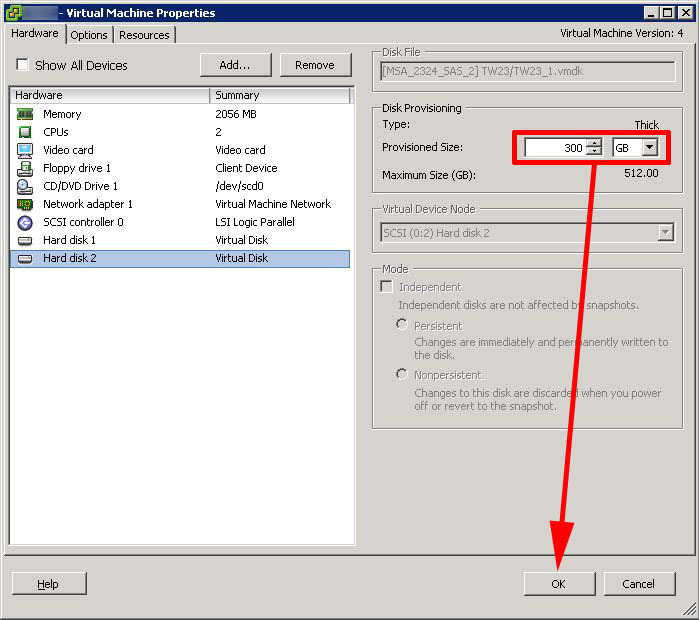
change hdd size for vm

Re-sizing the guests "Volume" Option 1 - Graphically

Note: To do this using diskpart skip forward to number 10.

3. On the guest > Right click "My Computer" > Manage > Locate "Disk Management". You will see there's some free space that's appeared on the end of the drive, (Click action > Re-scan if you can't see it).
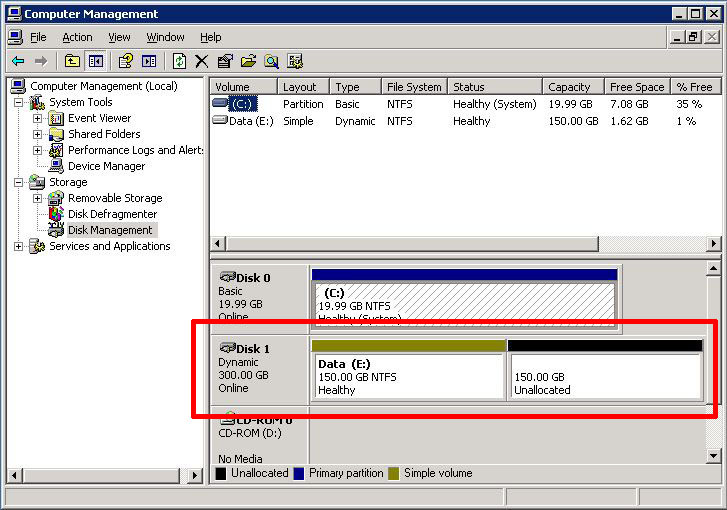
locate free space

4. Simply right click the existing volume and select "Extend Volume".
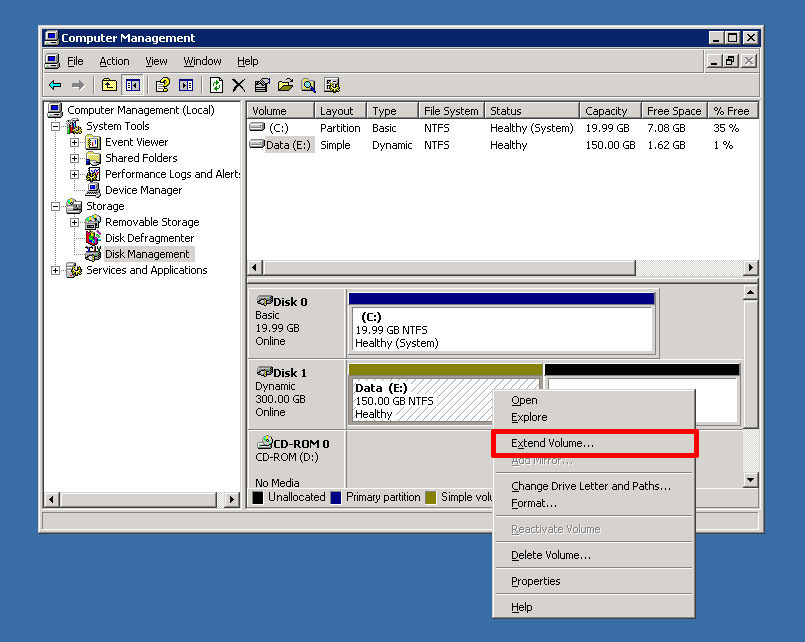
how to extend volume grpahically

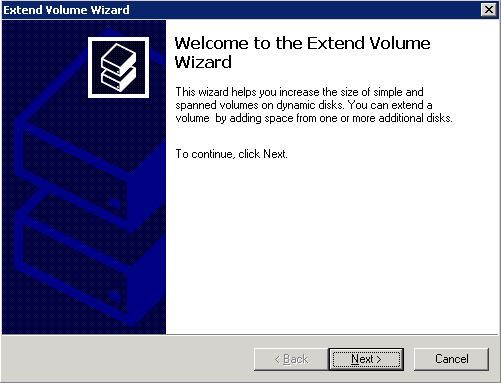
5. Next.

extend volume

6. Copy in the extra space you want to assign (all of it probably) > Next.
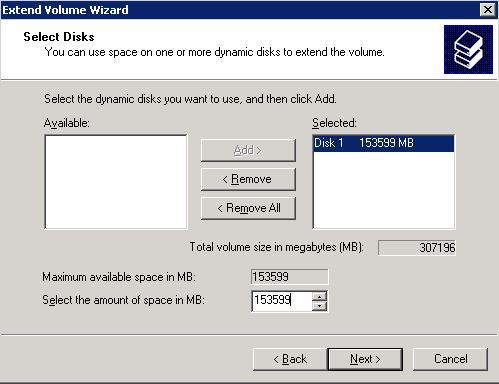
extend volume wizard

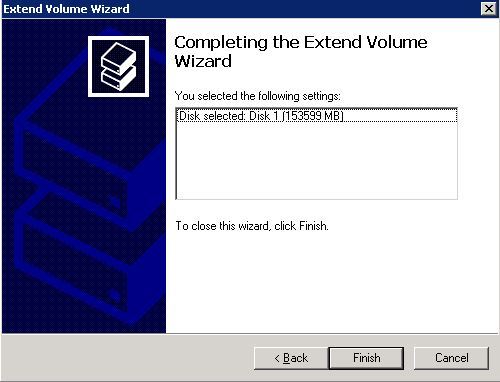
7. Finish.

8. All the physical drive should now be committed.
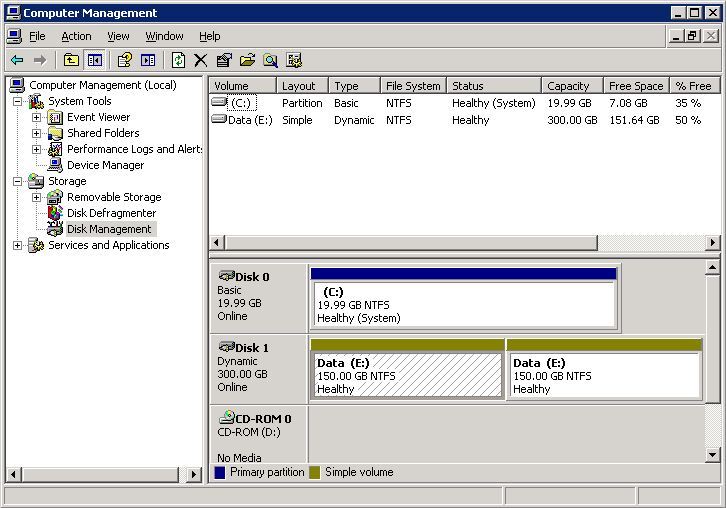
commit changes to drive

9. And just to be sure, look in "My Computer" the drive is now 300 GB.
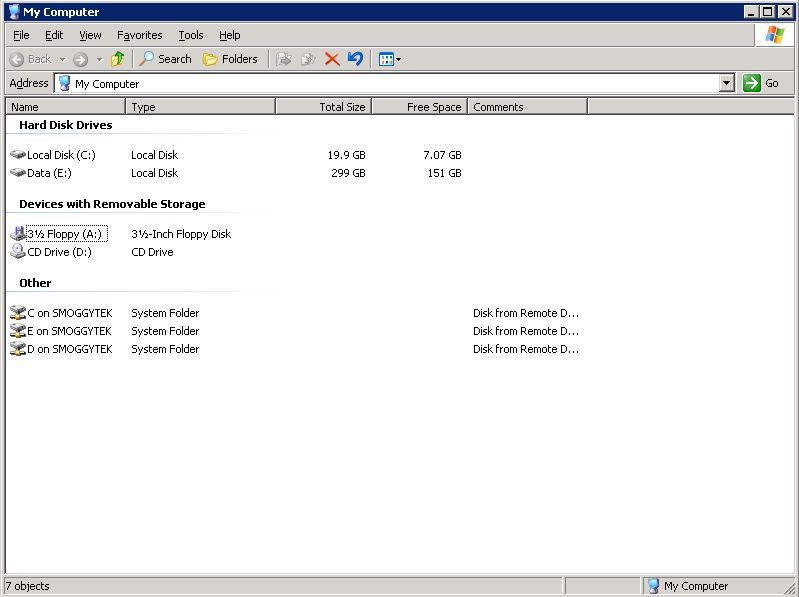
drive size

Re-sizing the guests "Volume" Option 2 - From Command Line with diskpart

10. Start > run > cmd{enter}

diskpart list volume select volume x --Where x is the volume number of the volume to be re sized
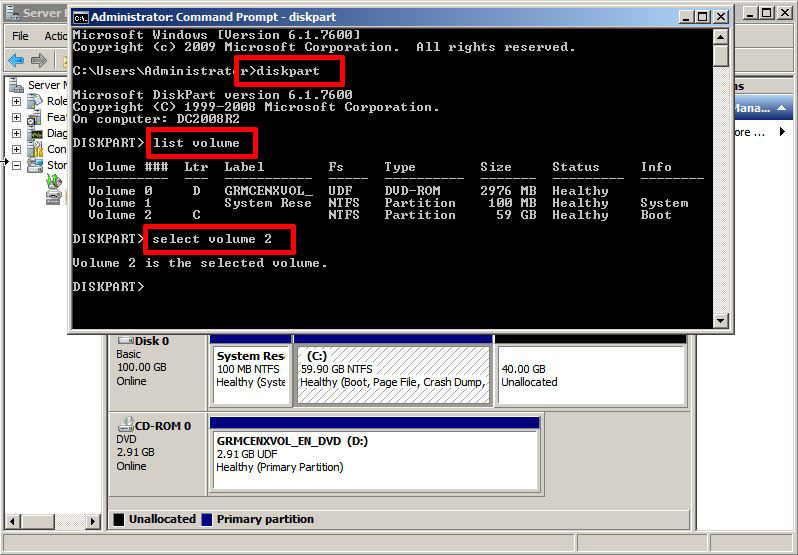
skpart list volumedi

11. The final command is simply extend (This uses ALL the available free space.) Note the volume size in the picture below has jumped up by 40 GB.
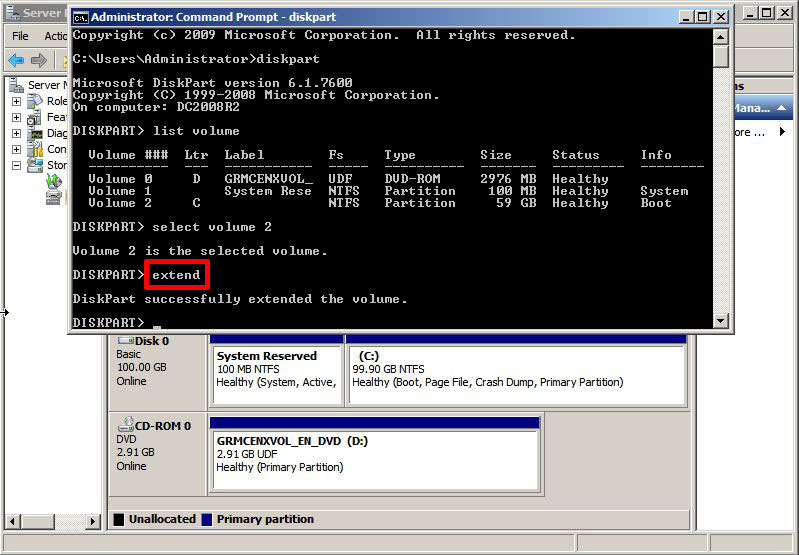
diskpart using exend

Resizing a System (boot) Partition.

Server 2008 R2 and Windows 7 can do this quite happily. Older versions of Windows do not like having their system drive re sized, you see the following error if you try,

Error:
The volume you have selected may not be extended.
Please select another volume and try again.
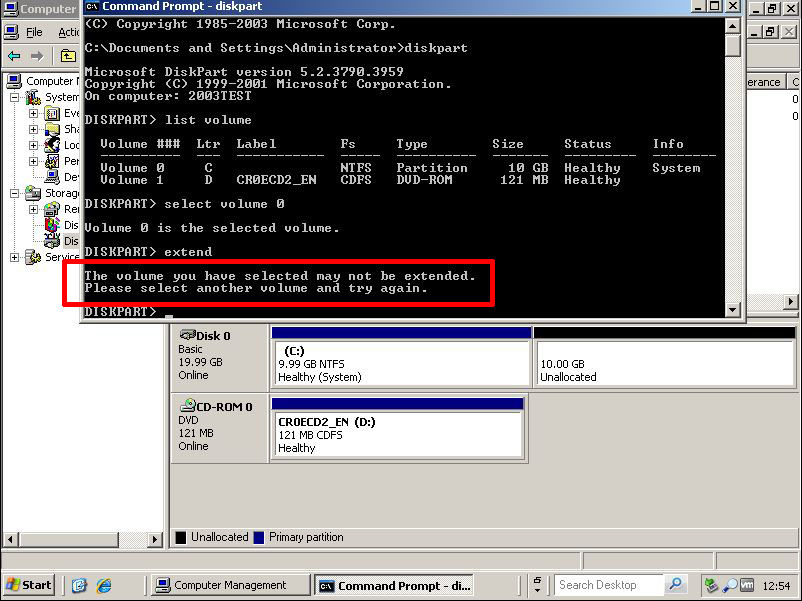
The volume you have selected may not be extended.

Option 1 (Connect this drive to another machine)

In a virtual environment this is much simpler, but even if its a real physical hard drive, you can put it into another server and re size it. In an ESX environment simply do the following,

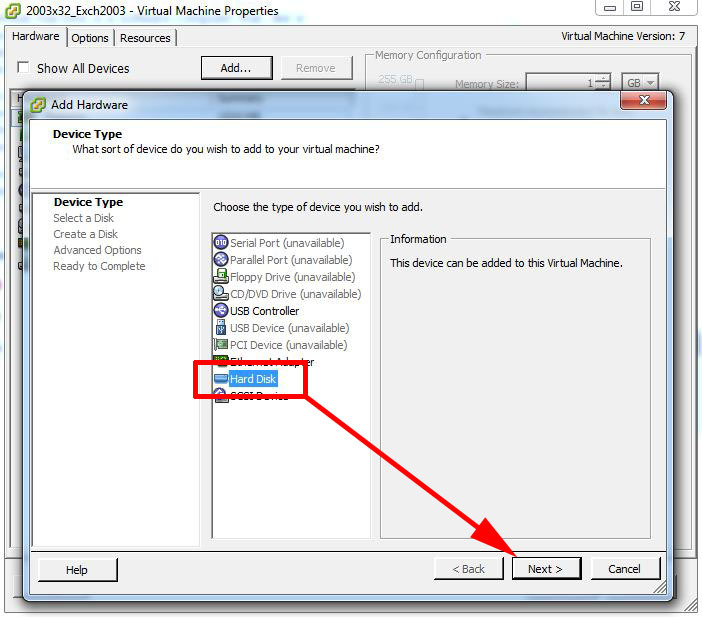
1. Shut down the machine that needs its drive re sizing, then go to another virtual machine's properties and select add.
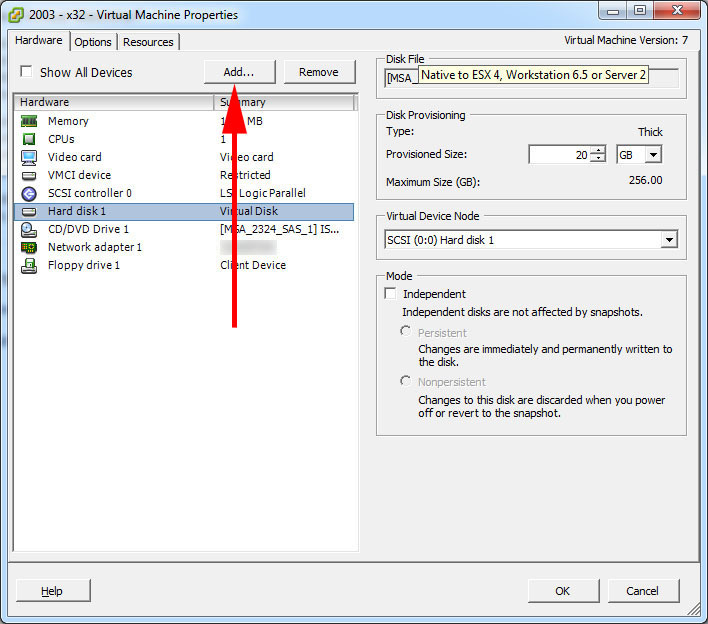
add hard drive to vmware

2. Hard Disk > Next.

3. Select "Use existing virtual disk" > Next.

use existing virtual disk

4. Browse to the the drive we want to re size > Next.
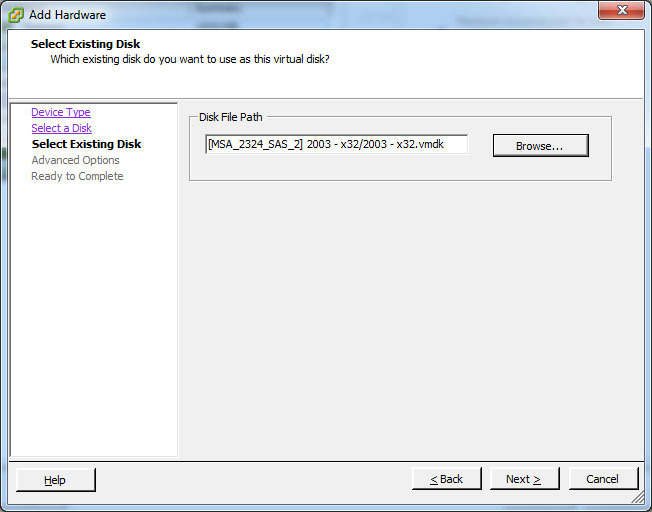
vmdk location

5. Next.

scsi options vm

6. Finish.

add hard drive to virtual machine

7. Now on the VM (Action > Re-scan disks). You will see the drive, and it's not listed as a system drive, so you can extend it using any of the methods listed above.
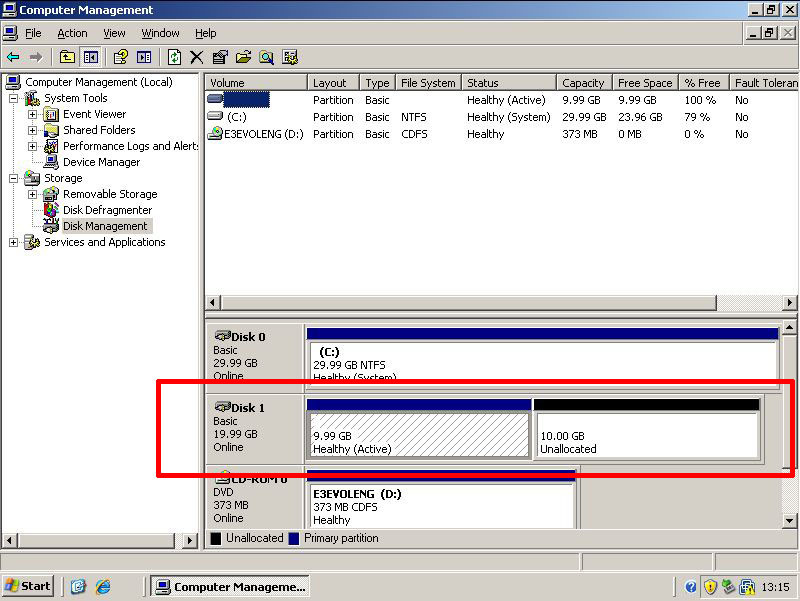
use free space with diskpart

8. For example, heres the drive re sized using diskpart.
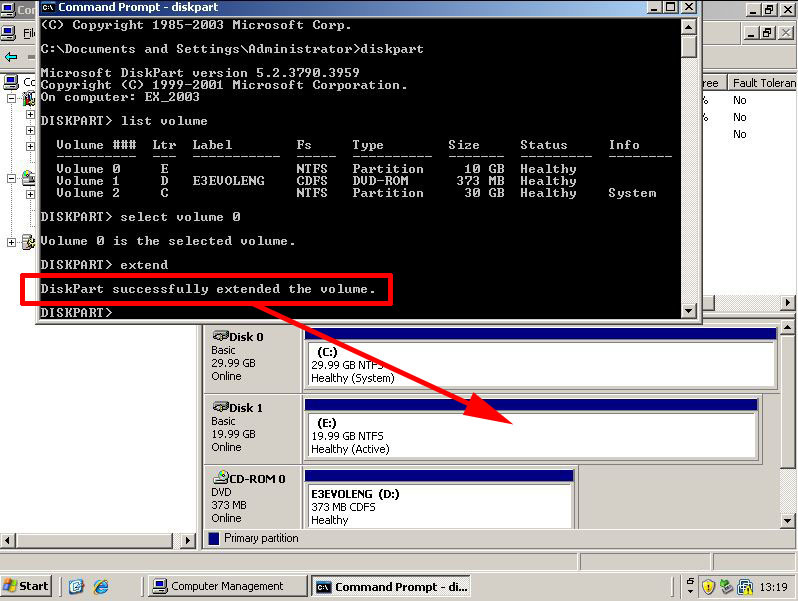
diskpart extend

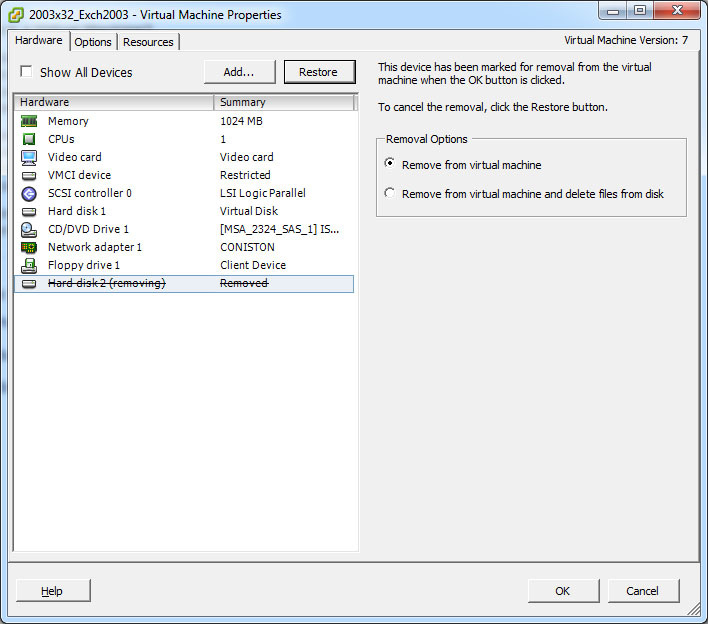
9. when you have re sized the drive go back to the properties of the machine you have connected it to, and remove it.
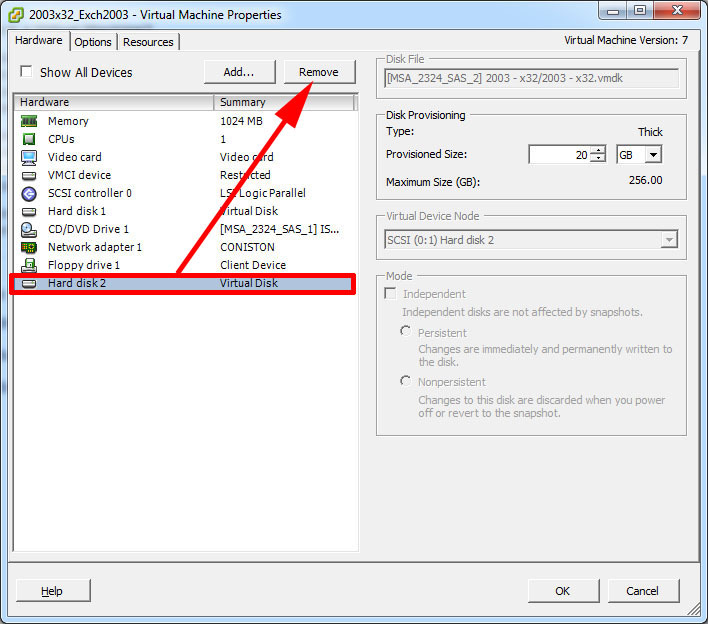
remove vmdk

10. OK.

remove disk form vm

11. Now power on the original VM and drive will be re sized.
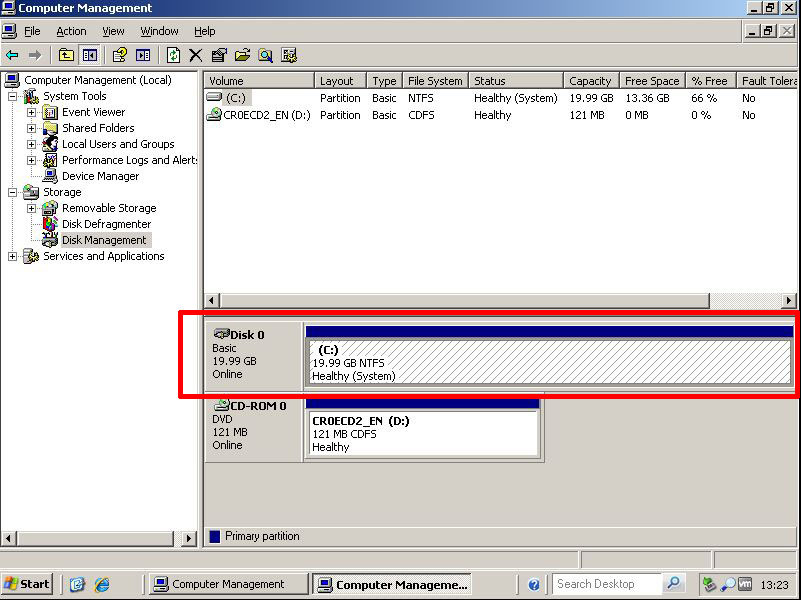
resize vm disk

Option 2 (Re size the Windows volume with GParted)

Note: This will work for a physical server as well.

1. Here's our system drive with some nice shiny free space.
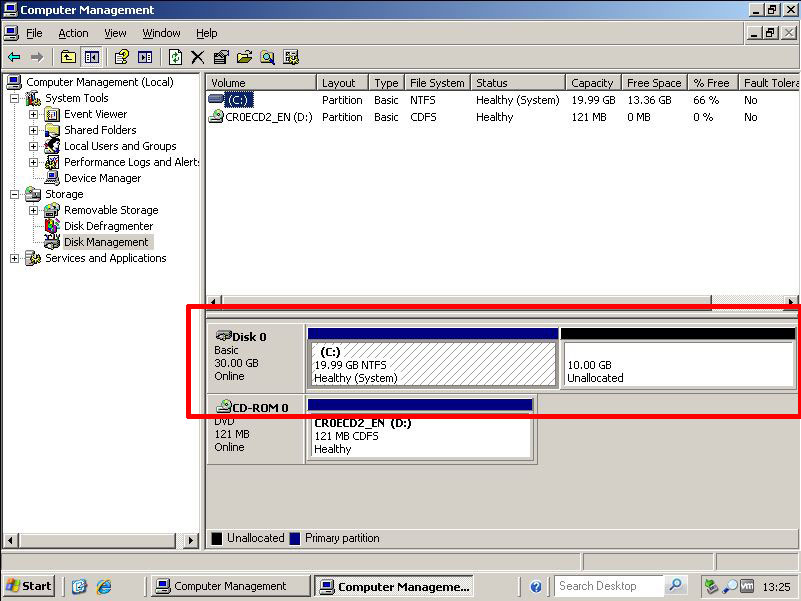
repartition servers c drive

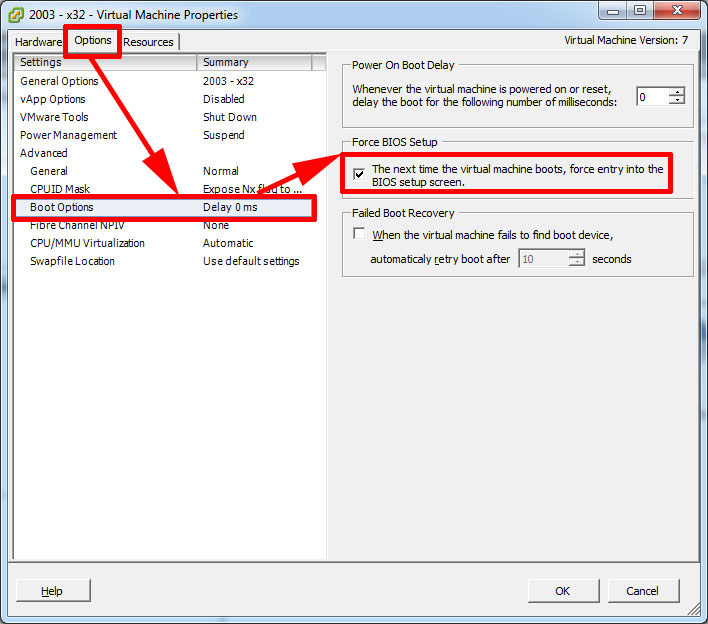
2. Make sure the server in question can boot from CD, in VMware do the following to boot to the machines BIOS, for a real server watch the screen as the server boots for instructions (Usually F10, F1 or Esc but differs depending on vendor).
boot vm to bios

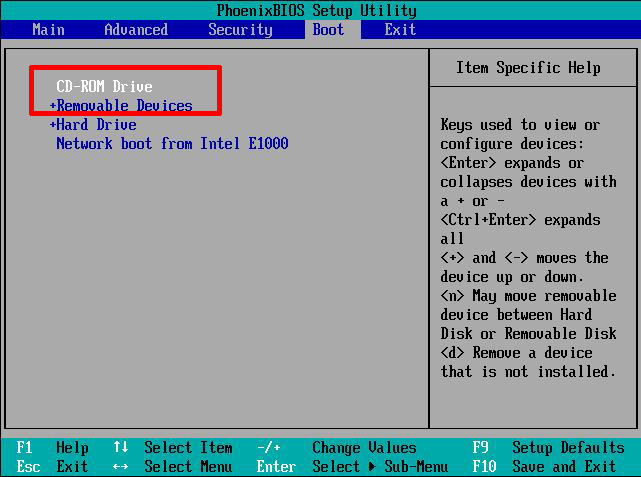
3. Locate the boot order and make sure CD/DVD is at the top of the list.
bios boot order vmaware

4. Download GParted burn the image to CD, if you are working on a real server (use ImgBurn if your stuck). Or simply point the VM to the iso image, and boot the machine in question from it. At the welcome screen press Enter.

linux partition editor

5. Use your arrow and tab keys to select Don't touch the keymap > OK.

keymap

6. Pick a language.

language selctionn linux

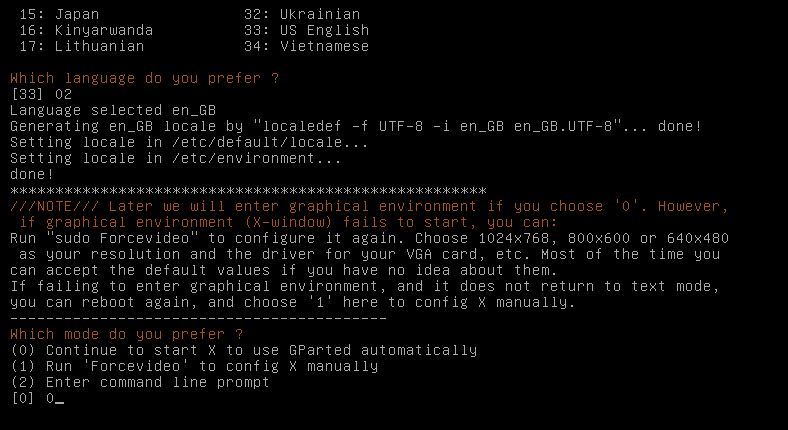
7. We want to launch the GUI (X Windows), so select 0 (Zero).
boot to linux

8. Select Re size/Move > Drag the arrow to include the free space > Re size/Move.

change c drive size

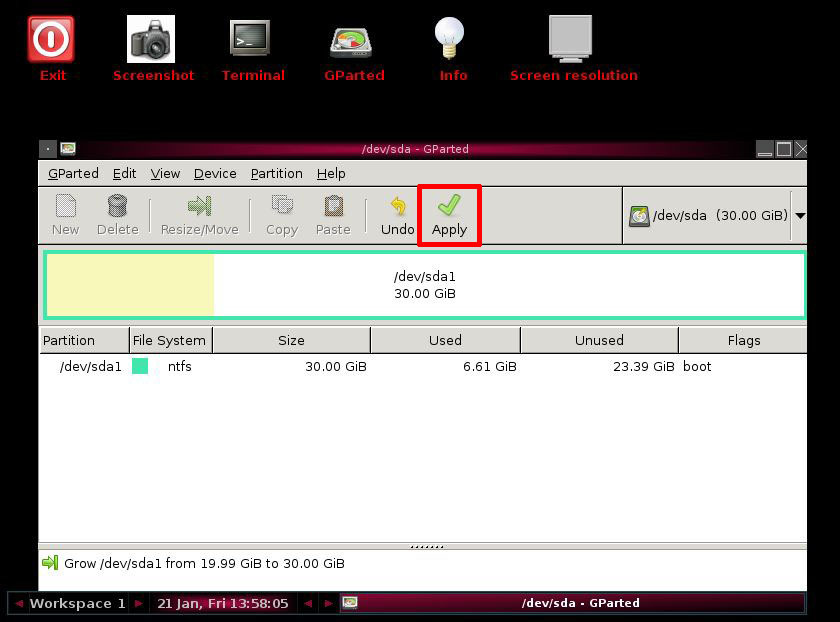
9. Apply

repartition vm

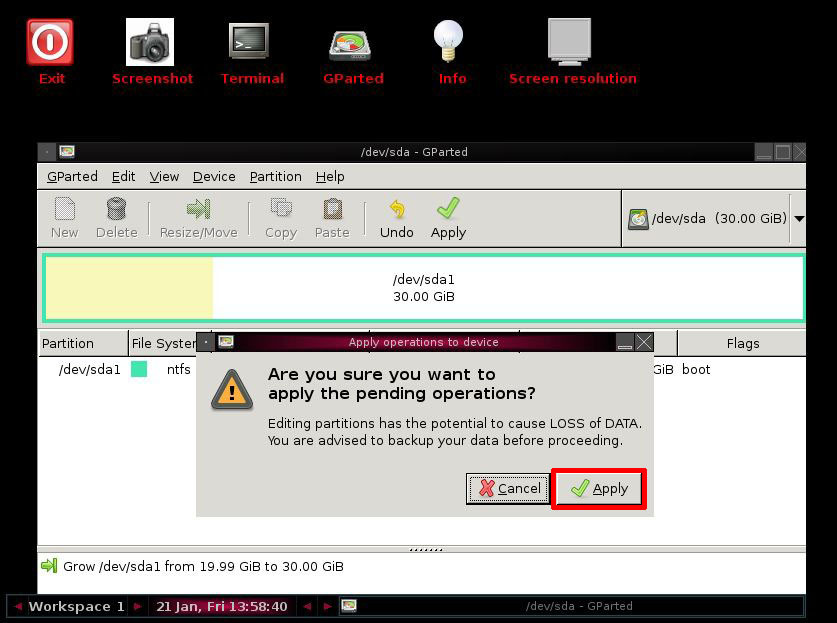
10. Apply.

apply partition changes

11. Close.

change partitions with boot disk

12. Click GParted > Quit.

gparted with vmware

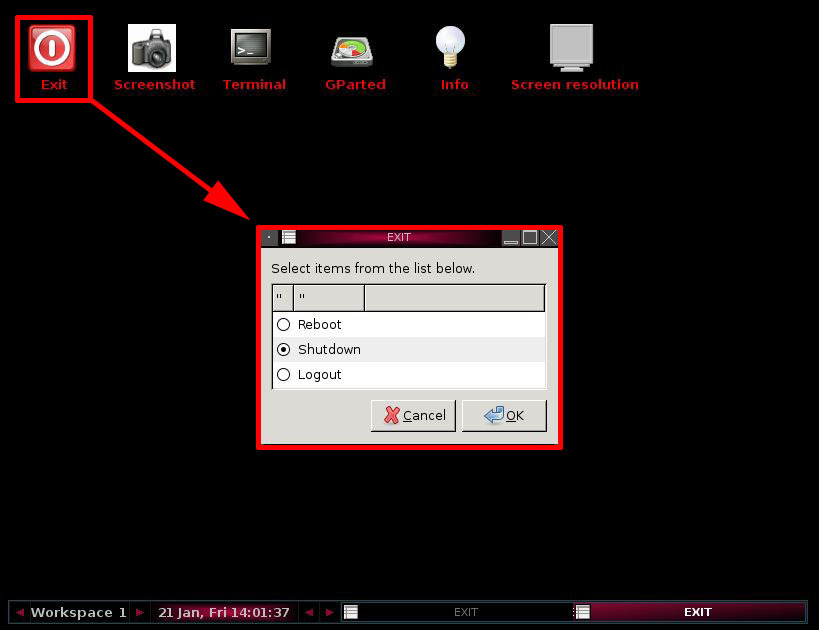
13. Exit > Reboot/Shutdown > OK.

<emptshutdowny>

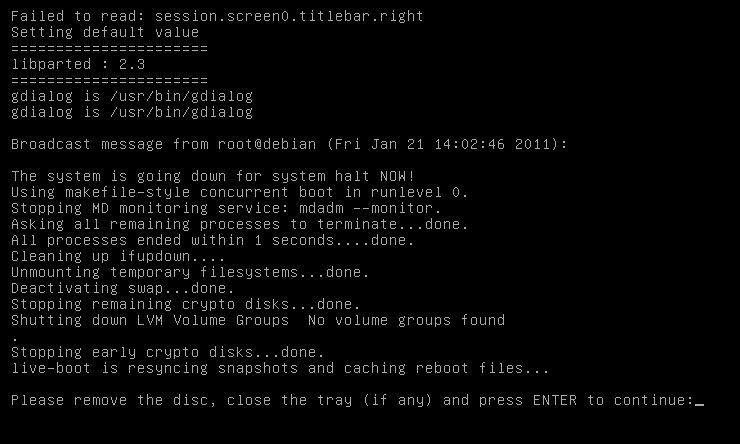
14. Remove the CD/ISO and press Enter.
repartition vm with boot disk

15. The guest will run chkdsk the firs time it boots. This is normal don't panic.
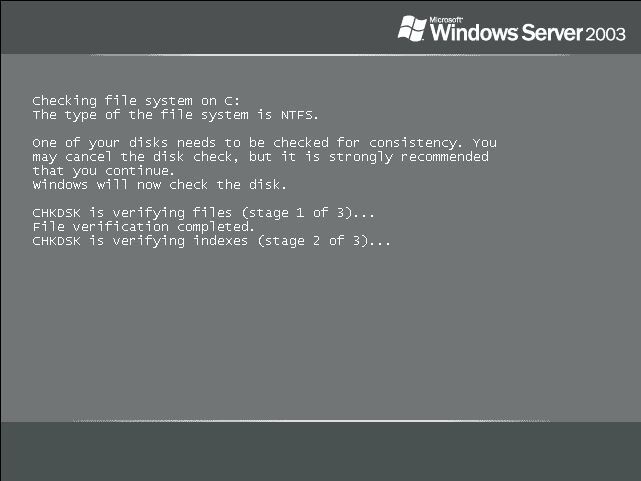
chkdsk running

16. Once booted the volume will be re sized.
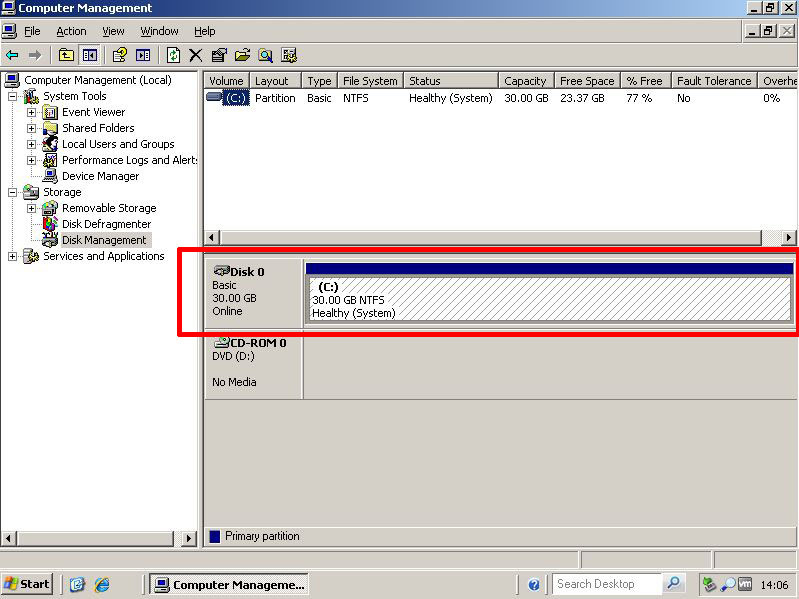
resize boot partition

Shrink a Windows Partition with diskpart

1. To actually make the volume smaller with diskpart, the initial commands are the same.
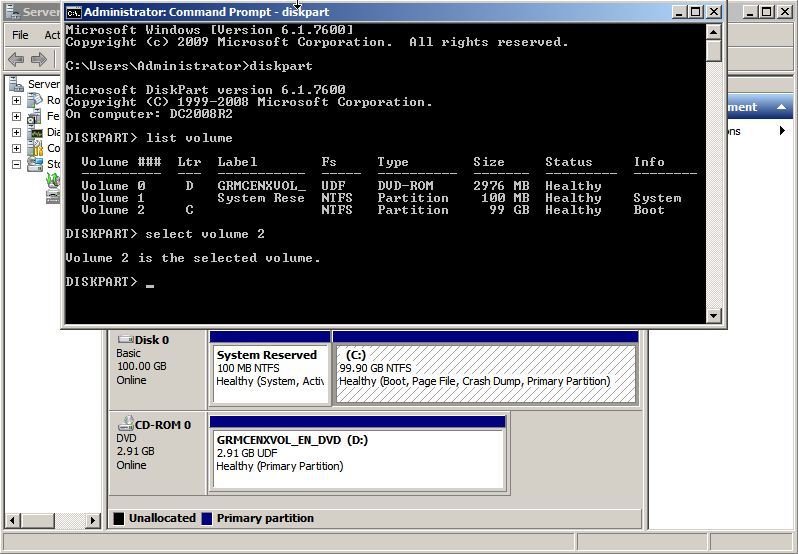
vmware diskpart

2. If you use "shrink" on its own is will shrink the drive as much as it can (I cannot think of any situation where you would do this!). So to shrink the volume by 10 GB simply issue a "shrink minimum 10240". (The figure in in MB).
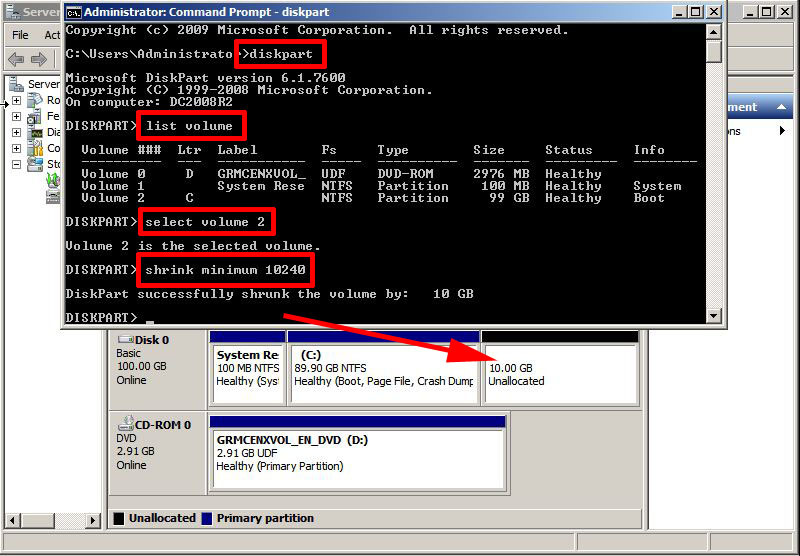
diskpart shrink

Thursday, September 5, 2013

VMFS 5 VMFS 3–What’s the Deal ?

New in vSphere 5 is the VMFS-5 file system for block storage.  VMware customers who upgraded from VMFS-2 to VMFS-3 will likely remember the shell game which had to be played in order to migrate VMs from VMFS-2 to VMFS-3.  It worked but it wasn’t the easiest process, particularly if spare storage was not available in order to move VMs around.

VMware has drastically improved the VMFS upgrade process with vSphere 5.  Not only can existing VMFS-3 datastores be upgraded to VMFS-5 in place, but the upgrade can be performed with running VMs on the storage being upgraded.  Now you might be asking yourself a few questions:

  1. If ESXi 5.0 hosts can run VMs on VMFS-3 or VMFS-5 (there’s a flexible improvement right there), then why even bother upgrading to VMFS-5?
  2. Is there any technical difference or advantage between net new VMFS-5 datastores  and upgraded VMFS-5 datastores which were once VMFS-3?

By now, you may understand what new features VMFS-5 offers.  A unified block size, 64TB datastores without using extents, improvements surrounding sub block allocation (SBA), support for many more files on a datastore, and a new partition type which is what enables datastores larger than 2TB.  These new features should answer the first question of “VMFS-5: what’s in it for me?”  But what about the 2nd question of “Does it matter which migration path I take to get my datastores to VMFS-5?

The tactical approach differences are subtle but nonetheless could be impactful depending on the environment.  I’ve compiled information from vSphere 5 beta documentation and VMware blogs.  I then categorized the information into two bulleted lists to compare similarities and contrast the differences.

Similarities between upgraded and newly created VMFS-5 datastores:

  • Both upgraded VMFS-5 and newly created VMFS-5 support the new 64TB datastore limit. Obviously you’ll need an array which supports growing the existing datastores beyond their original size which would have been 2TB-512B or less.
  • Both upgraded VMFS-5 and newly created VMFS-5 support the new 64TB passthru (physical) RDM limit.
  • The maximum size of a non-passthru (virtual) RDM on VMFS-5 is still 2TB -512 bytes.
  • The maximum size of a file (ie .VMDK virtual disk) on VMFS-5 is still 2TB -512 bytes.
  • The VMFS-3 to VMFS-5 conversion is a one-way process. After you convert the VMFS-based datastore to VMFS-5, you cannot revert back to VMFS-3 without creating a new VMFS-3 datastore (which by the way vSphere 5 supports along with the legacy 1, 2, 4, 8MB block sizes).

Differences between upgraded and newly created VMFS-5 datastores:

  • VMFS-5 upgraded from VMFS-3 continues to use the previous file block size which may be larger than the unified 1MB file block size. Copy operations between datastores with different block sizes won’t be able to leverage VAAI.  This is the primary reason I would recommend the creation of new VMFS-5 datastores and migrating virtual machines to new VMFS-5 datastores rather than performing in place upgrades of VMFS-3 datastores.
  • VMFS-5 upgraded from VMFS-3 continues to use 64KB sub-blocks and not new 8K sub-blocks.
  • VMFS-5 upgraded from VMFS-3 continues to have a file limit of 30,720 rather than the new file limit of > 100,000 for newly created VMFS-5.
  • VMFS-5 upgraded from VMFS-3 continues to use MBR (Master Boot Record) partition type; when the VMFS-5 volume is grown above 2TB, it automatically switches from MBR to GPT (GUID Partition Table) without impact to the running VMs.
  • VMFS-5 upgraded from VMFS-3 will continue to have a partition starting on sector 128; newly created VMFS-5 partitions start at sector 2,048.

Based on the information above, the best approach to migrate to VMFS-5 is to create net new VMFS-5 datastores if you have the extra storage space, can afford the number of Storage vMotions required, and have a VAAI capable storage array holding existing datastores with 2, 4, or 8MB block sizes.

For more information about vSphere 5 storage enhancements and VAAI, take a look at the following links:

Wednesday, September 4, 2013

Map a network drive to your online SkyDrive, Amazon S3 or Google Apps


Zack Whittaker shared this neat trick:


The process is very simple, and if you're looking at this post and think it looks like a lot - it really isn't.

1. Download Gladinet Cloud Desktop. It's free and only around 12MB so it should download fairly quickly. 2. Start the installation process and go through as you normally would. 3. During the installation process, ensure these two boxes are ticked.

4. Launch the Gladinet Cloud Desktop application at the end of the installation screen by hitting Close. 5. During the setup, make sure you only use the free starter edition. This is all you will need.

6. Select a drive letter which you want to use as your network SkyDrive. I normally choose Z: as my primary network drive letter.

7. Pick a space on your local hard drive where you can use as an offline cache. Make sure that drive is in your own user profile area (if you have multiple users on one machine) and that the drive you select also has at least 25GB free.

8. If you wish to encrypt your local cache, then select the tick box as so and enter in a password. Hit Next. 9. Ensure that automatic updates are checked, then hit Finish. A status icon will appear in the notification area.

10. A new dialog box will appear. Select the tick box at the bottom making sure the screen doesn't show next time, then hit "Mount Disk Storage or Web Storage as Virtual Directory". 11. Select "Windows Live SkyDrive" or the storage provider of your choice, and name it.

12. On the next screen, follow the instructions on screen and enter in your service username/email and password. 13. Hit "Yes" to any prompts, such as those to accept the end-user licence agreement.

And there you have it. You can still only upload files smaller than 50MB, but if you want to carry out a full system backup and place it on the web, this can still be done. Backup the hard drive and convert (if it isn't done automatically) to an ISO. Use this ISO in WinRAR or a file splitting utility, and create the portions smaller than 50MB in size. Upload away, and your hard drive is backed up securely and safely online.